

Key Takeaways
Why Exterior Maintenance Is About Structure, Not Just Curb Appeal
It's easy to treat a patch of peeling paint or a few crumbling mortar joints as purely cosmetic problems — things to fix eventually, when time and budget allow. But the exterior of your home is your primary line of defense against moisture, temperature swings, and pest intrusion. When that defense weakens, structural damage rarely announces itself immediately. Instead, it creeps in quietly behind walls, beneath floors, and into framing members where it becomes expensive to reverse.
The tasks outlined below aren't about keeping up appearances. Each one addresses a specific failure pathway — a way that water, air, or biological growth can compromise materials your home depends on. Some you can handle yourself with basic tools and a free afternoon; others are worth budgeting for a qualified tradesperson. Either way, catching these issues early is almost always significantly cheaper than repairing what happens when they're ignored. See also what happens when minor maintenance gets ignored for a clear look at how small problems escalate.
Inspect and Repoint Deteriorating Mortar Joints
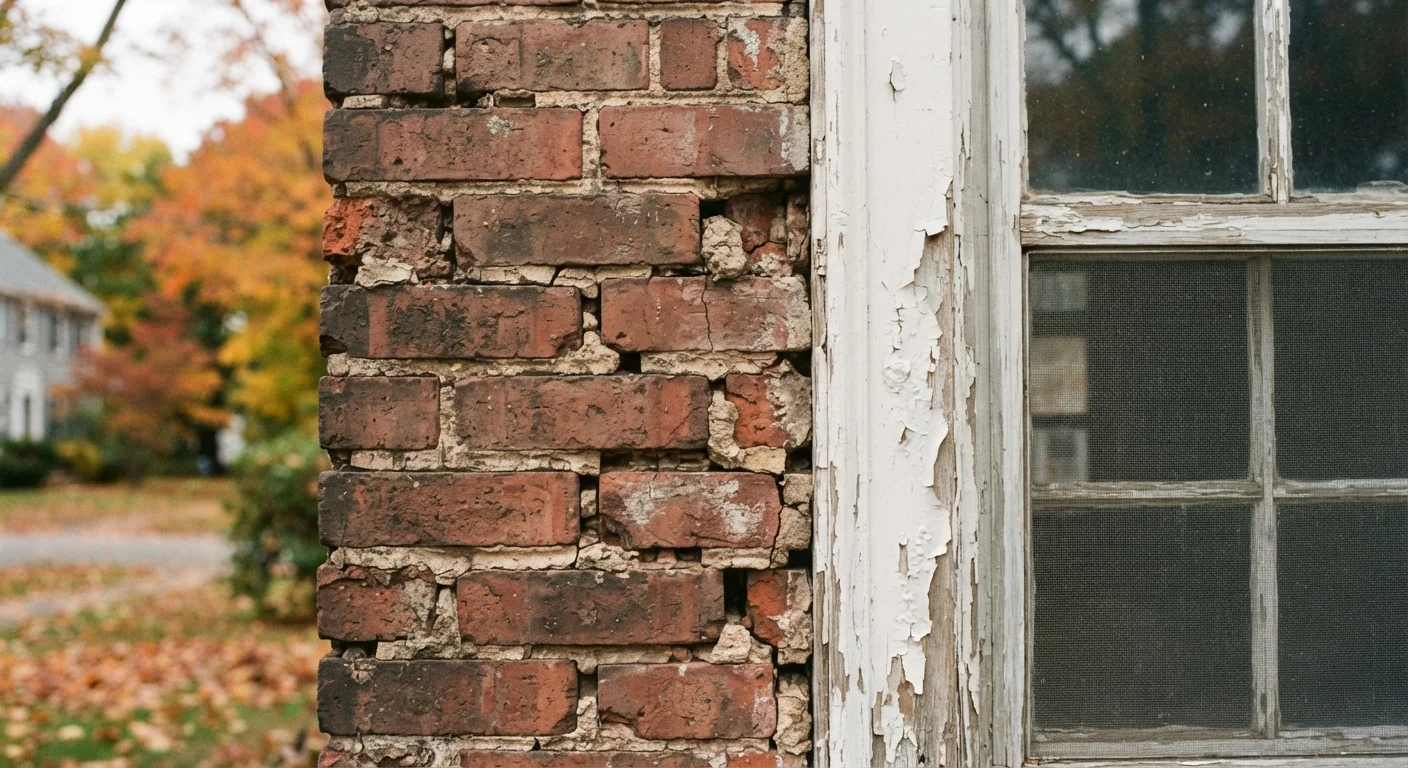
Mortar — the material binding bricks or stone together — is softer and more porous than the masonry it surrounds, and it weathers faster. When joints begin to crack, erode, or crumble, they allow rainwater to enter the wall assembly. In freezing temperatures, that water expands, accelerating the damage in a cycle that can eventually destabilize brickwork and allow moisture into interior wall cavities.
Inspect mortar joints annually, paying close attention to chimney stacks, gable ends, and any south- or west-facing walls that take significant rain exposure. If joints are recessed more than approximately ¼ inch or show visible cracking, repointing (also called tuckpointing) is warranted. This is a job many experienced DIYers handle on lower sections of wall, but for chimneys or elevated areas, a qualified mason is the safer and more reliable choice.
Deteriorating mortar joints allow water in — and freeze-thaw cycles make the damage compound rapidly.
Address Cracked or Hollow Render Promptly
Rendered (stucco) walls protect the underlying structure from moisture, but render relies on a secure bond with the substrate beneath it. When that bond breaks — through thermal movement, impact, or water ingress — the render can crack or become hollow, a condition you can often detect by tapping lightly and listening for a drum-like sound instead of a solid thud.
Hollow or cracked render doesn't just look bad; it traps moisture between the render and the wall, promoting mold growth, corroding any metal reinforcement, and eventually leading to spalling. Small surface cracks can sometimes be filled with a compatible patching compound, but larger hollow sections typically need to be cut out and re-rendered. Because matching render texture and mix is tricky, this is often best handled by a professional plasterer, particularly on older homes where the original mix may differ from modern products.
Hollow render traps moisture behind it, accelerating both mold growth and structural deterioration.
Clear and Inspect Gutters and Downspouts Every Season
Gutters and downspouts manage an enormous volume of water during a typical rainfall. When they're blocked by leaves, moss, or debris, water overflows at the fascia — the timber board gutters are fixed to — and can saturate the soffit, rot the fascia itself, and eventually allow water into the roof structure or travel down the exterior wall to the foundation.
Clean gutters at minimum twice a year: once after autumn leaf fall and again in late spring after pollen and seed pods have settled. While cleaning, check that downspouts discharge water at least several feet away from the foundation and that splash blocks or extension pipes are directing flow away from the building. Also check that gutter sections are still properly pitched toward outlets — sagging sections hold standing water, which accelerates corrosion and attracts insects.
Blocked gutters are one of the most common — and preventable — causes of fascia rot and foundation moisture.
Repaint or Reseal Exterior Timber Before Failure, Not After
Exterior timber — window frames, doors, fascias, soffits, cladding — depends entirely on its painted or sealed surface to resist moisture. Once that coating fails, bare timber absorbs water, swells, contracts, and begins to rot. The frustrating reality is that repainting timber in good condition takes hours; replacing timber that has rotted through can take days and cost many times more.
Look for paint that is peeling, flaking, or showing bare wood beneath. Pay particular attention to the bottom edges of frames and boards where water tends to sit longest. Light surface deterioration can often be addressed with scraping, sanding, priming, and recoating. If wood feels soft or spongy when pressed, rot has already established — affected sections should be cut out and replaced before recoating. Always use exterior-grade paint or stain rated for your climate's conditions. For window and door sealing, draught-proofing guidance covers the adjacent task of sealing gaps around frames.
Repainting timber on schedule costs a fraction of what rot remediation and replacement demands.
Check Caulking Around Windows, Doors, and Penetrations
Caulk (flexible sealant) fills the gap between fixed elements — window frames, door surrounds, utility penetrations — and the surrounding wall. Over time it shrinks, cracks, and loses adhesion, creating pathways for driven rain to enter wall cavities. Unlike large cracks in masonry, failed caulk is easy to miss on a casual inspection but can cause significant hidden moisture damage over a season.
Run your finger along every caulked joint and look for sections that have lifted, cracked, or visibly shrunk away from the surface. Failed caulk should be removed completely before new sealant is applied — applying fresh caulk over old compromised material rarely creates a reliable seal. Use a sealant rated for exterior use and appropriate for the materials being joined. This is a straightforward DIY task that requires only basic tools and yields a high return in moisture protection relative to the time invested.
Failed caulk around frames is a small fix that prevents outsized water damage inside wall cavities.
Inspect the Roof From the Ground — and Know When to Call a Professional
You don't need to climb onto your roof for a useful inspection — in fact, walking on certain roof types can cause damage or create a serious safety risk. Using binoculars from ground level or an upper-floor window, look for missing, cracked, or curling shingles; damaged or missing flashing around chimneys, skylights, and valleys; and visible sagging in any section of the roof plane.
Even a small area of damaged or missing material can allow water to penetrate roof decking during a heavy rain event. If you spot anything concerning, have a licensed roofing contractor assess and repair it before the next significant weather event. Do not attempt roofing repairs yourself unless you have the appropriate training, equipment, and safety setup — falls from roofs account for a significant proportion of serious home improvement injuries each year. Budget for a professional inspection every few years even when nothing appears obviously wrong.
Ground-level roof inspections catch early warning signs — but repairs should be left to qualified professionals.
Make Exterior Maintenance a Consistent Habit
Most of these tasks only need to be done once or twice a year — typically in spring and late autumn before temperatures drop. The key is building a reliable inspection rhythm rather than reacting to visible failure. A methodical walk around your home's exterior with a notepad takes less than an hour and can surface problems while they're still manageable.
Build a Simple Exterior Inspection Checklist
Keep a printed or digital checklist specific to your home's exterior materials — brick, render, timber cladding, etc. Walk the perimeter systematically twice a year, noting any changes since your last inspection. Photographing problem areas is useful for tracking whether issues are stable or worsening between visits, and it helps any contractor you bring in assess the situation quickly.
If time is a recurring obstacle, sustainable home maintenance habits for busy homeowners offers practical strategies for staying on top of upkeep without dedicating every weekend to it. For a structured approach across all seasons, the seasonal home maintenance calendar breaks tasks down month by month. Treating your home's exterior as a system — rather than a list of isolated cosmetic items — is what separates reactive repairs from effective prevention.